Posts

Semester 2 Week 9 - Brinkley

Image
During class time, we had a long team meeting to go over all of the supplies needed for the surgeries and what needed to be ordered. Here are some of the notes that I took: After that we went down to the ocular lab with Dr. Rickard and he showed us how to use the new microscope, and he said that we would be allowed to use it to get better pictures of our design.  In our weekly meeting with Dr. Gordon, we discussed our new design and showed how it worked. we got approval to switch to the new design and drop the computer simulation completely. This will allow all three of us to be hands on in the testing process and all of the surgeries on the eyes and head.  This week there was a lot of prep for the pig eye surgery that we will be doing in class tomorrow. I began researching again what the Ahmed valve surgery was and watched videos of the actual surgery taking place. I also found this step by step picture procedure of how it is implanted, and we will be utilizing that for ...

Semester 2- Week 9 Kierstin

Image
  This is our current valve under the microscope in the eye lab. We looked at the Ahmed plates under it, and we may use it to get pictures of our final product. Worked on Solidworks body shape to replicate the baerveldt. Then I had to extrude the tubes. There is only one tube inserted, and the two angled “tubes” are just extruded cuts. The dimensions are comparable to the baerveldt.  Had to extrude where the plates will be inserted.  This is what the final valve would look like with the ahmed resistors in. One adjustment we could make is to have the valves more on the sides, but this valve represents the concept well, and the size and shape. Eye surgery prep:  Cut and clear a pocket for the valve.  When inserting it needs to be 8 mm behind the limbus (or the coloring part of the eye)  The baerveldt valve goes under the eye muscles, its about 10 mm behind the limbus, much farther back.  Things needed for simulation:  Get a water bottle to continuou...

W9S2

Image
 Placed orders for surgical procedures:  Amazon.com: Reli. ProGrade Contractor Trash Bags 55 Gallon (20 Bags w/ Ties) Black 55 Gallon Trash Bags Heavy Duty, Garbage Bags / Construction Bags (2 mil) (55 Gallon - 60 Gallon), Black : Health & Household Amazon.com: Greenour 10 Pack Disposable SMS Lab Coat Blue with Pockets for Adult Knitted Collar and Cuffs Breathable Fluid Resistant (Large) : Clothing, Shoes & Jewelry Amazon.com: 100Pcs Black Disposable Face Mask, 3 Ply Black Face Masks with Soft Elastic Ear Loops : Industrial & Scientific Amazon.com: Baking Sheets Set of 2, HKJ Chef Cookie Sheets 2 Pieces Stainless Steel Baking Pans & Toaster Oven Tray Pans, Rectangle Size 20L x 14W x 1H inch & Non Toxic & Healthy & Easy Clean…: Home & Kitchen Amazon.com: Advanced Dissection Kit - 37 pieces total. High Grade Stainless Steel Instruments perfect for Anatomy, Biology, Botany, Veterinary and Medical Students - By Poly Medical. : Industrial & Scien...

W8S2

Image
  Merging on FEBio:  When merging suture and tubing through FEBio the components do stay together     - best to input both items and merge them then apply mesh, material, load, etc.  Problem:  when applying pressure the tubing does not seem to move or expand I am going to play around with applying loads on different parts of the tubing **first attempt I applied load in the inside of the tubing and around the outside of the suture  Attempted on dragging CAD file into FEBio with the product already merged it failed it looks like assembled parts cannot be inputted even though it is an STL file  **When drawing the tubing alone and the suture alone they can be inputting into FEBio but the meshing is all messed up and I have not figure out how to fix it it is much easier to draw it inside FEBio  When merging on Fluid Mechanics:  the suture does not stay when simulation is applied going to try merging it in SM then switch it to fluid mechanics...

Semester 2- Week 8 Kierstin

Image
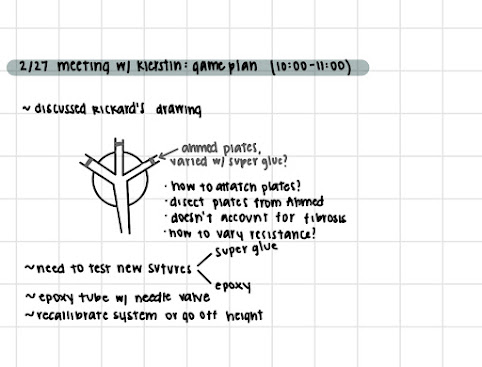
 In Class:  In Class, we presented our progress and listened to other groups' projects. We also went to get our picture taken for the capstone book.  Project Work:  Dr. Rickard talked with me on Thursday morning. He thought that it would be a good idea to take the resistor plates out of the Ahmed valves and add them to the end of our valve to be the resistances because they are already calibrated to help with unhealthy IOP.  My concern for this is that it neglects our solution to fibrosis. This wasn't the exact problem that we were trying to solve, but I think our previous design definitely helped with it. Dr. Rickard said that fibrosis will start close to the valve and then work out, so it will eventually be a problem, but not at the beginning.  I would be concerned this valve would be harder to implant and would have the same fail rate as the Ahmed valve, but it would be a good valve to test in comparison to our valve to see the functionality.  Brink...

Semester 2 Week 8 - Brinkley

Image
 This week in class we had presentations and pictures. I got to class early to pick up the valves as props for the presentation and to go over my slides one last time. The presentation I thought went really well. After the presentation I completed the peer evals. This semester I feel like we are all working really well together and have found our own individual strengths. This has allowed us to get a lot done and to work efficiently.  Kierstin and I had a planning meeting of two we were going to continue our project and figure out the specific pressure values and resistor sizes for dripping. In this meeting she also showed me the drawing that Dr. Rickard gave her. In this drawing he suggested using the Ahmed valves resistance mechanism and implanting it into out three tubing design system. we made a plan for how we were going to do this and other ways that we could make new resistors. One of our ideas was to fill our tube with hard epoxy and create resistors out of this. Later...