Posts

Showing posts from February, 2023

W8S2

Image
  Merging on FEBio:  When merging suture and tubing through FEBio the components do stay together     - best to input both items and merge them then apply mesh, material, load, etc.  Problem:  when applying pressure the tubing does not seem to move or expand I am going to play around with applying loads on different parts of the tubing **first attempt I applied load in the inside of the tubing and around the outside of the suture  Attempted on dragging CAD file into FEBio with the product already merged it failed it looks like assembled parts cannot be inputted even though it is an STL file  **When drawing the tubing alone and the suture alone they can be inputting into FEBio but the meshing is all messed up and I have not figure out how to fix it it is much easier to draw it inside FEBio  When merging on Fluid Mechanics:  the suture does not stay when simulation is applied going to try merging it in SM then switch it to fluid mechanics  No error shows it just does not open the simulat

Semester 2- Week 8 Kierstin

Image
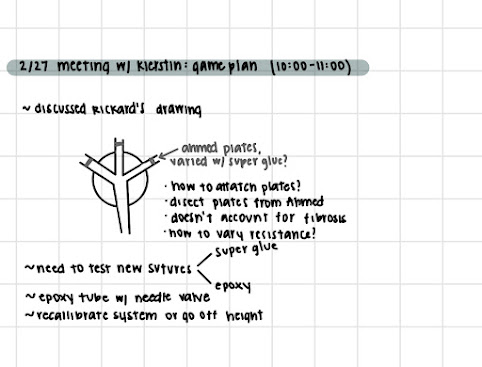
 In Class:  In Class, we presented our progress and listened to other groups' projects. We also went to get our picture taken for the capstone book.  Project Work:  Dr. Rickard talked with me on Thursday morning. He thought that it would be a good idea to take the resistor plates out of the Ahmed valves and add them to the end of our valve to be the resistances because they are already calibrated to help with unhealthy IOP.  My concern for this is that it neglects our solution to fibrosis. This wasn't the exact problem that we were trying to solve, but I think our previous design definitely helped with it. Dr. Rickard said that fibrosis will start close to the valve and then work out, so it will eventually be a problem, but not at the beginning.  I would be concerned this valve would be harder to implant and would have the same fail rate as the Ahmed valve, but it would be a good valve to test in comparison to our valve to see the functionality.  Brinkley and I drew out this id

Semester 2 Week 8 - Brinkley

Image
 This week in class we had presentations and pictures. I got to class early to pick up the valves as props for the presentation and to go over my slides one last time. The presentation I thought went really well. After the presentation I completed the peer evals. This semester I feel like we are all working really well together and have found our own individual strengths. This has allowed us to get a lot done and to work efficiently.  Kierstin and I had a planning meeting of two we were going to continue our project and figure out the specific pressure values and resistor sizes for dripping. In this meeting she also showed me the drawing that Dr. Rickard gave her. In this drawing he suggested using the Ahmed valves resistance mechanism and implanting it into out three tubing design system. we made a plan for how we were going to do this and other ways that we could make new resistors. One of our ideas was to fill our tube with hard epoxy and create resistors out of this. Later in the w

Semester 2 Week 7 - Brinkley

Image
 This week in the allotted capstone time period Kierstin and I worked on our suture design. We are still trying to find the perfect suture to tubing ratio to create the seepage levels that we desire. Below is our testing results:  In the below tests we tested 3 different materials and three different sizes with hard epoxy coating. We were hoping that this would make the sutures slightly bigger which would be perfect for our tubing. The nylon 3/0 was much to large with the coating, the polyester 5/0 and silk 4/0 were too small for our design and did not block any water.  After these failed attempts we did try the super glue method again. We coated the 2/0 silk suture evenly so that it would be stiff enough to insert into our tube. This did work, but our pressure was fairly high at 36 cm, which is about 28 mmHg.  This method needs to be tested again at lower pressure values, but due to the presentation this week we ran out of time.  In this time we also used Dr. Gordon's idea of 3D p

S2W7

Image
  found merge button (blue double arrow coming together) just need to click on objects wanting to merge (best to do it before adding loads and boundaries)  Worked on Notebook  - Recorded different tubes going through the same amount of pressure  0.6x0.3 0.6x0.4 0.6x0.5 Pressure = 0.4 or 21mmHg (which it the average glaucoma pressure on people) 

Semester 2- Week 7 Kierstin

Image
  Lab time:  Brinkley and I went to the print lab and got some purged material to see if it would be a suitable resistor in our system. The sizes of their nozles were .4mm, so a little too big (we wanted .3mm) but we tested it anyway. The 3D-printed material was much too big of a resistor for our valves. It was tough to insert, and there was no flow when we tested it in the system.  Brinkley and I coated different sutures in hard epoxy to test them in the system.  The data we got from these tests are:  We will try more tests with the silk at different heights, and test with the polyester again to see why we were having discrepancies last week.  I updated our design drawings and made them +- .025mm tolerances shown under the dimensions in the unless otherwise specified box, and changed our engineering hourly pay to $43 per hour.  I also updated del 6 and went through the first section to make sure it only included components that our final design uses. I went through and numbered the di

S2W6

Image
 Getting Error of initializing material:  FEBio Error, Failed to Initialize Material - FEBio Forum merge two objects - FEBio Forum Got pressure of all different IDs was not able to record